Your first hour on Isla Sombra is about survival, not profits. I learned this the hard way -- my first run I focused on cooking and ended up broke with no clients. Complete the tutorial missions, meet your contact Shady, secure your first hideout, and make deliveries until you hit $5,000. Cooking comes after you have a reliable client pipeline. This guide walks through every step from washing up on the beach to building a sustainable early-game operation.
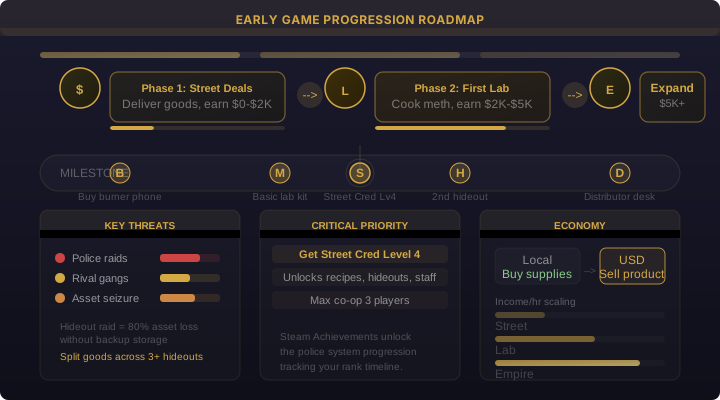
Your first steps:
You wash up on a beach with nothing. Head to the marker on your minimap to meet Shady, your first contact. He gives you a burner phone with the ShadyComm app, your first 10g of low-grade product, and 3 client contacts. ShadyComm is your lifeline -- all orders come through this app. I check it every 10 minutes. Missing orders hurts your reputation and slows early cash flow.
Once you have the phone, explore the immediate area. Your starter beach is on the Small Island, which has no police presence and very few NPCs. This is intentional -- it gives you a safe zone to learn the basics before moving to more dangerous territories.
Deliveries ($0 to $2,000):
Open ShadyComm and accept delivery jobs closest to your position. Each pays $80-150. The strategy is simple:
- Accept all jobs in your current zone (usually 3-5 orders available)
- Sort them by distance on the map
- Plot a circular route starting with the closest
- Complete all jobs in one run
- Return to reload and accept new jobs
A full route pays $300-600 per 20-30 minute loop. The Steam quick-start guide notes that police hours bring extra cash -- during these windows, demand increases and customers pay a premium. I try to keep product moving during these windows for the payout bonus.
Practical example: Your first hour timeline
| Time | Action | Expected Income |
|---|---|---|
| 0-10 minutes | Complete tutorial, meet Shady, get phone | $0 |
| 10-30 minutes | Complete 3-4 local deliveries | $300-600 |
| 30-45 minutes | Accept cross-zone delivery, explore new area | $150-300 |
| 45-60 minutes | Complete 3-4 more deliveries, return to base | $300-600 |
| End of hour 1 | Total earnings | $750-1,500 |
By the end of your first hour, you should have $750-1,500 in cash. Do not spend this on upgrades yet -- save for the lab kit and second hideout.
Set up your first lab:
Once you have $2,000, buy a basic lab kit from the hardware store. The first recipe card (basic meth or cannabis) is in the tutorial zone warehouse -- find it before buying ingredients. Do not guess recipe ratios. I wasted my first batch of materials guessing. Basic meth starts with ephedrine as the primary precursor, combined with solvents and catalysts that the recipe card will specify.
| Equipment | Cost | Source | Purpose |
|---|---|---|---|
| Basic chemistry table | $800 | Hardware store | First production setup |
| Recipe card | Free (find it) | Tutorial zone warehouse | Unlock first recipe |
| Basic ingredients | $200-400 | Pharmacies, farm supply | First batch materials |
| Storage containers | $100-300 | General store | Organize materials |
Buy a second hideout:
After hitting $5,000, buy a second hideout. Community guides on Reddit consistently recommend this before upgrading gear. One raid can wipe a single-hideout player out completely. The best second hideout location is typically a rural cabin at $1,500-4,500 -- low visibility, close to raw material sources, and unlikely to attract police attention.
| Priority | Item | Cost | Why |
|---|---|---|---|
| 1 | Second hideout | $1,500-4,500 | Raid protection, split risk |
| 2 | Bike | $400 | 3x faster than running |
| 3 | Better backpack | $250 | Doubles carry capacity |
| 4 | Lockpick kit (tier 2) | $150 | Access better loot spots |
| 5 | Lab kit | $800 | First production capability |
Setting difficulty and raid settings:
Before starting, consider your preferences in the game settings:
| Setting | Effect | Recommended for Beginners |
|---|---|---|
| Raids enabled | Hideouts can be raided by police | On (intended experience) |
| Police heat | How quickly police respond to crimes | Normal |
| Resource scarcity | How abundant ingredients are | Normal |
| Co-op mode | Play with up to 3 players | Optional -- solo is fine |
You can adjust these at any time, but changing mid-game can feel inconsistent. If this is your first playthrough, keep raids enabled and police heat on normal -- the game is balanced around these settings.
Related Guides:
- 10 Tips for Beginners -- Survival mechanics the tutorial does not teach
- Early Money Guide -- Detailed delivery strategies and income optimization
- 10 Common Mistakes -- Pitfalls new players should avoid
- Hideout Guide -- Where to buy your second hideout
Community Verification & Resources
Data values may shift with patches. Cross-check against community resources before building your strategy.