Police in DDS2 have a heat system similar to open-world crime games. Your wanted level -- None, Person of Interest, Suspect, or Wanted -- determines pursuit intensity. Parkour breaks line of sight faster than any other method I have found. This guide covers escape routes for every zone, the wanted level system, and items that help you get away clean.
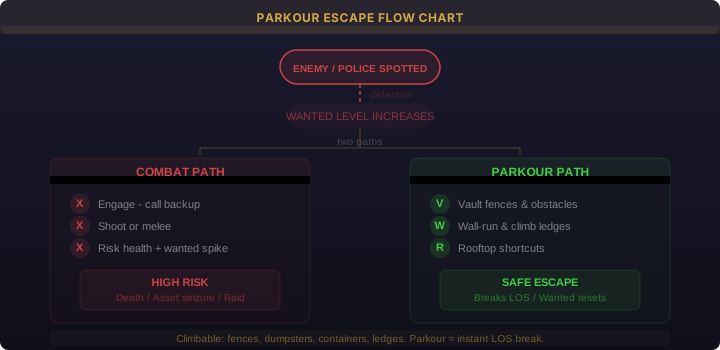
Wanted level system:
Based on the Fandom wiki and community discussions, the heat system works as follows:
| Level | Name | Police Behavior | How to Reduce |
|---|---|---|---|
| 0 | None | Standard patrols | No action needed |
| 1 | Person of Interest | Increased patrols in area | 3-5 minutes of inactivity |
| 2 | Suspect | Active search, roadblocks | 5-10 minutes, avoid crime |
| 3 | Wanted | Full pursuit, helicopter | 10+ minutes, hide in safe spot |
Each level escalates how aggressively police search for you. At Wanted level, helicopters can spot you from the air, making open-ground movement extremely risky. The key is breaking line of sight before the helicopter locks onto your position.
My escape flow:
When police start chasing, I follow this sequence:
- Sprint to nearest obstacle -- Fence, wall, barrier, anything that blocks their line of sight
- Vault or wall-run -- Clear the obstacle to break initial pursuit
- Climb to higher ground -- Roof, balcony, ledge. NPCs cannot path onto most roofs
- Crouch and wait -- Let the initial search pass. Do not move until the minimap alert icon starts pulsing (indicating reduced search radius)
- Move through parkour shortcuts -- Once heat drops one level, travel between sectors using parkour routes instead of main roads
The Steam sector connection guide documents all routes between areas, including police checkpoint locations to avoid. I recommend memorizing the escape routes near your primary hideout first.
Practial example: Escaping a lab raid in Slavs Bay
Slavs Bay has high police density, making it one of the riskier production zones. Here is the escape route I use:
- Exit through the rear door (not the front -- police usually approach from the road)
- Vault over the wooden fence immediately behind the building
- Wall-run along the concrete barrier to reach acontainer stacking area
- Climb the shipping containers to the roof of the adjacent warehouse
- From the warehouse roof, jump across to the building with the green awning
- Crouch behind the rooftop AC unit until the search subsides
- Descend on the far side of the building and use the alley network to reach a different sector
This route takes approximately 20 seconds. Fighting the police would take 30-60 seconds and increase your wanted level.
Items that help evasion:
| Item | Effect | Source |
|---|---|---|
| Smoke bombs | Temporary disorient, breaks police line of sight | Craft or purchase |
| Bribe cash | Instant heat reduction (requires cash on hand) | Must have cash on person |
| Energy drinks | Stamina recovery for longer parkour chains | Vendors |
| Better backpack | Carry more supplies for extended escape sequences | Store |
Why parkour beats fighting:
| Factor | Fighting | Parkour Escape |
|---|---|---|
| Time to safety | 30-60 seconds | 10-20 seconds |
| Police heat increase | High (adds wanted level) | None |
| Ammo/health cost | Consumes resources | None |
| Repeatability | Limited by ammo and health | Infinite |
| Long-term consequences | Higher raid probability | No increase |
Zone-by-zone escape route priority:
| Zone | Best Route Type | Difficulty | Key Moves |
|---|---|---|---|
| Urban/streets | Roof access via wall-run | Medium | Wall-run, jump climb |
| Industrial | Container vaults + pipe climbs | Easy | Vault, climb |
| Rural | Tree line + terrain obstacles | Easy | Sprint, crouch |
| Coastal | Building-to-building jumps | Hard | Long jump, wall-run |
| Jungle | Tree cover + water escape | Medium | Swim, bush crouch |
Related Guides:
- Parkour Guide -- Core movement mechanics and key bindings
- Raid Prevention -- Avoiding police raids entirely
- Police Anti-Raid Guide -- Comprehensive police behavior and anti-raid strategies
Community Verification & Resources
Data values may shift with patches. Cross-check against community resources before building your strategy.