Not all staff roles are equally important at every stage of the game. The optimal hire order I settled on after testing multiple configurations is: Dealer first (for automated income), then Cook (scales production), then Guard (protects investment), then Distributor (enables multi-hideout logistics). The community guides confirm this priority. This guide covers each role in detail, optimal assignment strategies, and how to unlock every role efficiently.
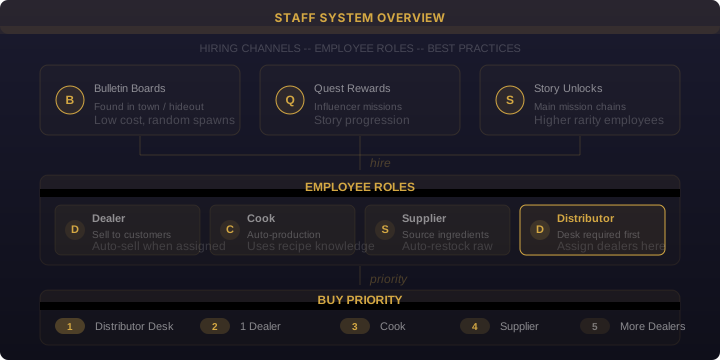
Role breakdown:
Each role serves a specific function in your operation. Understanding what each does will help you prioritize your hiring order.
Dealers handle customer interactions. The Fandom wiki explains that once you hire a dealer and set them up in any territory, you can assign customers from that region to them. The dealer will automatically fulfill orders from the stock you provide, generating passive income. This was my first automation unlock and it made a huge difference -- instead of running every delivery myself, I could focus on production and expansion while the dealer handled the retail end.
Cooks automate batch processing. With a cook assigned to a lab station, you can produce product without manual mixing and timing. The cook will process ingredients into finished product at a consistent rate. This is most valuable once you have a reliable ingredient supply chain and want to scale production beyond what you can do manually. I noticed my output roughly doubled after hiring my first cook.
Guards reduce raid probability. The Fandom wiki confirms hideout raids are affected by visibility and wanted level. Guards mitigate this by patrolling the perimeter and providing early warning. The exact mechanic is that guards increase the "security rating" of a hideout, which offsets its visibility rating. A high-visibility hideout with multiple guards can be as safe as a low-visibility hideout without guards.
Distributors transfer product between hideouts. Essential for the multi-hideout specialization strategy where each location produces one product type. The distributor moves raw materials from your supply hideout to your processing hideout, and finished product from processing to your sales hub. Without a distributor, you spend a lot of time traveling between hideouts moving inventory.
Assignment strategy by stage:
| Stage | Net Worth | Staff Setup | Focus |
|---|---|---|---|
| Early | $5k-15k | 1 Dealer | Automate first territory income |
| Mid | $15k-50k | 1 Dealer + 1 Cook | Production scaling and passive income |
| Late | $50k-200k | 2 Dealers + 2 Cooks + 1 Guard | Multiple territories and asset protection |
| Endgame | $200k+ | Full team (all roles) + co-op partners | Complete automation across all zones |
Practical example: When to hire each role
Here is the exact timeline I follow in a new playthrough:
- Hour 3-5 (net worth ~$8k): Build the distributor desk. This costs approximately $2,000 in materials. Your first employee will be assigned as a dealer. Choose the territory where you have built the most client relationships through deliveries.
- Hour 6-10 (net worth ~$20k): Hire your first cook. Install the lab upgrade (approximately $3,000) and assign the cook. Your production capacity will roughly double because the cook processes batches while you continue making deliveries.
- Hour 10-15 (net worth ~$40k): Hire a guard. Install the guard station (approximately $5,000). At this point your combined hideout value probably exceeds $15,000, making raid protection economically justified.
- Hour 15-20 (net worth ~$80k): Hire a second dealer for a new territory. Hire a second cook if production is still the bottleneck. Consider a distributor if you have three or more active hideouts.
- Hour 20+ (net worth $100k+): Full staff across all roles. Expand to all available territories.
How to unlock each role:
| Role | Unlock Method | Cost | Prerequisites |
|---|---|---|---|
| Dealer | Build distributor desk at hideout | ~$2,000 in materials | Basic hideout with room for desk |
| Cook | Upgrade lab station with cook equipment | ~$3,000 in equipment | Lab station already built |
| Guard | Build guard station at hideout | ~$5,000 | Hideout with exterior space |
| Distributor | Own 2+ hideouts | Cost of second hideout | Multiple hideouts purchased |
Staff limits and how to increase them:
The game limits how many employees you can have based on three factors: current Street Cred level, number of hideouts owned, and story progression. Here is how to increase your staff cap:
- Street Cred level -- Each new level of Street Cred increases your staff cap by 1. Focus on beating gang members and completing influencer missions.
- Hideout count -- Each hideout you purchase adds potential staff slots. You cannot assign more staff than your total hideout capacity supports.
- Story progression -- Certain story missions unlock additional staff capacity. Complete the main questline to maximize your hiring potential.
- Notice boards -- Completing notice board missions occasionally rewards new employee unlocks or increases capacity.
To check your current staff limit, open the employee management screen from your distributor desk. It shows your current staff count and maximum capacity.
Related Guides:
- Staff and Employee Guide -- How to hire employees from all sources
- Empire Guide -- Multi-hideout specialization with staff
- Reputation Guide -- Street Cred leveling to unlock more staff slots
Community Verification & Resources
Data values may shift with patches. Cross-check against community resources before building your strategy.