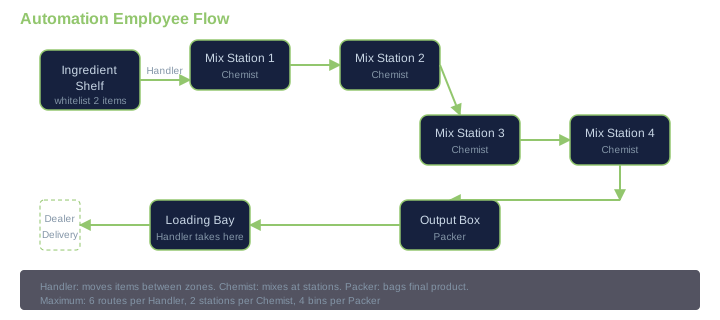
This guide is a room-by-room build order. Follow these steps in sequence to avoid common automation failures.
Step 1: Set Up The Loading Bay (Day 1, $0)
Before hiring anyone, clear the Bungalow's ground floor. The default furniture blocks employee pathing.
- Remove all furniture from the main room (table, chairs, lamp -- store or trash them)
- The loading bay is the south entrance -- keep this area entirely clear
- Goal: Open floor plan for shelf and station placement
Step 2: Install Ingredient Shelves (Day 1, ~$200)
Place 2 Large Storage Racks near the loading bay entrance. These are your ingredient buffers.
- Shelf 1: Weed ingredients (OG Kush, Green Crack, Sour Diesel as base)
- Shelf 2: Additives (Banana, Cuke, Battery, Horse Semen, Mega Bean)
- Position: Within 2 tiles of the loading bay door
- Why: Handler route from bay to shelf must be short (max 3 tiles) or route errors spike
Step 3: Place Mixing Stations (Day 2, ~$500)
Install 2 Mixing Stations in the center of the ground floor, side by side. Daisy-chain them using the Clipboard.
- Station 1: Input from Shelf 1 (base ingredient)
- Station 2: Input from Shelf 2 (additives)
- Output: Both stations output to a single transit shelf
- Cost: $100 per station ($200) + Clipboard ($25)
- Community note: One Chemist handles both stations efficiently. The Fandom Wiki and multiple Reddit threads confirm a 1:2 Chemist-to-Mixing Station ratio.
Step 4: Hire The Chemist (Day 2-3, ~$1,500)
Hire 1 Chemist (unlocked at Hustler II). Assign them to both Mixing Stations.
- Wage: ~$200/day
- Assignment: Station 1 and Station 2
- Test: Place 2 base ingredients + 2 additives on the shelves. The Chemist should pick from Shelf 1, mix at Station 1, move product to Station 2 via the daisy-chain, mix again, and output to the transit shelf.
- Failure check: If Chemist stands idle, verify daisy-chain is set. If still idle, the shelf-to-station route may be blocked.
Step 5: Set Up Packaging (Day 3-4, ~$300)
Place 1 MK1 Packaging Station (NOT MK2) and 1 output shelf on the ground floor.
- MK1 Packaging Station: $150
- Output shelf: $100
- Why MK1 and not MK2: The Fandom Wiki and community testing confirm that Handlers on MK2 Packing Stations operate at roughly half the speed of MK1. This was reported as a bug in v0.3.4f8 and has not been fully resolved as of v0.4.5. Use MK1 for Handler-based packaging. Reserve MK2 for manual packing only.
Step 6: Hire The Packer (Day 4, ~$1,500)
Hire 1 Packer (unlocked at Hustler III). Assign them to the Packaging Station.
- Wage: ~$200/day
- Assignment: MK1 Packaging Station
- Failure check: If Packer isn't bagging, the output bin may be full or product quality settings may be wrong. Check station output quality setting -- set to "Any Quality" unless you're specifically filtering.
Step 7: Hire The Handler (Day 4-5, ~$1,500+)
Hire 1 Handler (unlocked at Hustler I). Set up exactly 4 routes:
- Loading Bay to Shelf 1 (ingredient pickup)
- Loading Bay to Shelf 2 (additive pickup)
- Mixing Station 2 output to Packaging Station input
- Packaging Station output to product shelf
- Wage: ~$200/day (hire fee: ~$1,500 + $100 per existing employee)
- Route limit: Keep at 4 routes max. Community testing shows route errors spike above 6 routes. With 4 routes, error rate is near zero.
- Bottleneck alert: The Bungalow's limited shelf space means you can only stock 2 ingredient types per shelf. Keep recipes to 2-3 ingredients max. For the most profitable combos that fit this constraint, check the community mixing guide. For the single highest-profit-per-effort mix to automate first, see the Triple Dollar Strain guide.
Step 8: Set Up Delivery Supply (Day 5+)
Use Albert Hoover's Delivery app (unlocked at max relationship) to auto-supply your shelves.
- Order sizes: 15-20 units per delivery (lasts 3-4 in-game days at 8-12 bags/day production)
- Cost: ~$200-300 per delivery
- Frequency: Order every 3 in-game days
- Dead Drop vs Delivery: Use Dead Drops for relationship building (first 8-10 orders), then switch to Delivery for regular supply.
- Police risk: Running delivery routes while at high heat draws patrol attention fast. Keep heat below Level 2 when doing regular supply runs. For exact heat values per action, see the Heat System guide.
ROI Timeline By Setup Tier
| Metric | Entry (Steps 1-4) | Mid (Steps 1-6) | Full (Steps 1-8) |
|---|---|---|---|
| Property cost | $30,000 | $30,000 | $30,000 |
| Setup cost | $2,200 | $4,000 | $5,500 |
| Total investment | $32,200 | $34,000 | $35,500 |
| Employees | 1 Chemist | 1 Chemist + 1 Packer | 1 Chemist + 1 Packer + 1 Handler |
| Daily wage bill | ~$200/day | ~$400/day | ~$600/day |
| Production rate | 4-6 bags/day | 6-8 bags/day | 8-12 bags/day |
| Revenue/day (est.) | $400-720 | $600-960 | $960-1,440 |
| Net profit/day | $200-520 | $200-560 | $360-840 |
| Break-even | ~62-160 days | ~61-170 days | ~42-99 days |
| ROI adjusted for property | 0.6-1.6%/day | 0.6-1.6%/day | 1.0-2.4%/day |
The full automation setup (Steps 1-8) breaks even in roughly half the time of the entry setup. This is because the Handler dramatically increases production volume -- from 6 to 12 bags per day. The $1,500 Handler hire fee pays for itself in about 2-3 in-game days. If you can afford the upfront cost, go straight to full automation.
Practical Example
You're at Hustler II rank with $40,000 saved. You buy the Bungalow ($30,000) and have $10,000 left.
Day 1-2: Clear furniture, install 2 shelves ($200), 2 Mixing Stations ($200) + Clipboard ($25). Hire Chemist ($1,500). Total: $1,925.
Day 3-4: Install MK1 Packaging Station ($150) + output shelf ($100). Hire Packer ($1,500). Hire Handler ($1,500 + $100 fee). Total: $3,350.
Day 5: Start Albert Hoover Dead Drop orders for regular supply ($200). Production begins at 8-12 bags/day.
Day 12-15: Break-even on setup costs. From this point, production is pure profit.
Post break-even daily profit: ~$600-800/day (net of wages).
For scaling beyond the Bungalow, see the Manual vs Automation ROI Comparison. If you hit the Bungalow cap and want to accelerate cash before committing to the Barn upgrade, the Casino strategy can add $5-15K in a single session without any heat risk.
Related Guides
- Manual vs Automation ROI Comparison -- when to upgrade to Barn
- Schedule I Endgame Guide -- what to do after full automation
- Top 10 Community Custom Strains By Profit -- which recipes to automate first
- Triple Dollar Strain -- highest-profit-per-effort mix to automate first
- Heat System -- manage heat while running delivery supply routes
- Casino Strategy -- supplement income between automation cycles
- Property Rankings -- when to move from Bungalow to the next property
Community Verification & Resources
Data values may shift with patches. Cross-check against community resources before building your strategy.